
This article covers the topics given below.
- What is a Web App?
- Deployment environment Software packages.
- Create Web app.
- Azure Resources.
- The Azure resources in Visual Studio 2015 Update 3.
- Deploy Azure project.
- Creating WebpProject.
What is a Web App?
Web Application or Web app is a client–Server software Application in which the client or the client interface runs in a Web Browser. Common Web Applications are used as a Web Application.

Prerequisites
- Getting started with ASP.NET MVC 5 in Microsoft Visual Studio 2015.
- If you have Microsoft Azure Account & activate Visual studio subscriber benefits.
- Sign up with Azure account.
- Getting started in Azure app Service before
- Azure SDK.
- Visual Studio 2015 update 3.
Development Environment Software Package
- Azure SDK for .NET 2.9.
- Download the latest Azure SDK for Visual Studio 2015, if you don’t have it already.
- If you have Visual Studio 2013, you can download the latest Azure SDK for Visual Studio 2013.
Create Web app
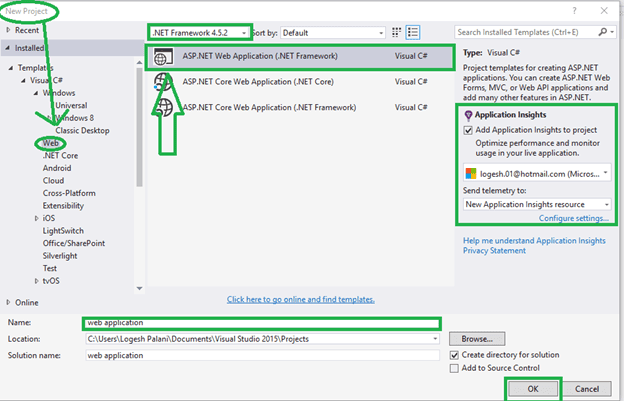
Step 1
Open Visual Studio 2015 Update 3 enterprise.
- Create File>New>Project.
- New Project-> click Visual C#> Web> ASP.NET Web app & select .NET Framework 4.5.2.
- Selected the Azure Application Insights (Insight Application is used for the monitor and your Web app availability, performance and usage).
- Enter your Application name.
- Click OK.
Step 2
- New NET Project Box-> select MVC and then click Change Authentication.

Step 3
- Change authentication and click No Authentication.

Step 4
- Click Host Azure.
- App Service is selected in the dropdown list.

Click OK.

Create Azure resources
- Create the app Service dialog box, followed by clicking Add account and sign in your Microsoft Azure ID & Password. Click Manage your account subscription or if you are already signed in, skip that step.

- In your Web app project, give a unique name as uniquein net domain.
- Now, you need to enter to create a different project.

- The URL for your Application name plus .azurewebsites.net. For example, if the name is Logesh, the URL is logesh.azurewebsites.net.

- Click New button, which is next to the resource group box and enter your resource group name or if you have already have resource group, select any one.
- Click New button, which is next to the app Service plan but don’t create new app Service plan.
- To configure app Service plan, dialog and enter your plan name, if you are preferred.

- In the location, dropdown list, choose the location, which is close to your location (The setting specifies Azure datacenter and your Application will run at a speed for the closed location (Server and client possible) accessing).
- In the size-> drodown click.
- In the Configure app Service plan dialog box, click in the Create app Service dialog box, click create.


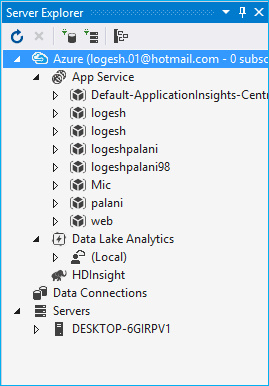
Azure Resources in Visual Studio
Solution Explorer shows your project files, references, JSON file, fonts and Controllers. If you want another page, go to the Web Application right click, followed by clicking Add >Web form or HTML form. Write the Web page name, followed by clicking Add to the link for Main page to New page and New page to Main page.
- Azure app Service activity is shown on app Service resources, which have been credited in Azure and click the link to publish your app immediately.

- Go to Cloud Explore Window, manage your Azure resources, including the Web app, which you just created and your app Services will be shown below on Logesh, as your website is there.


Build Azure Web Project
- In Solution Explorer, choose Publish

- Go to Publish Profile, which has setting to deploy Web project.
- To establish connection to publish Web, click Next and accessing publishing packages will be uploaded. Before you check your setting, build your API.

- Click next and check your Publish method. Prior to it, validate the connection, followed by clicking Next and before it, the Server name, site name, user name, password and destination URL are automatically inserted.

- You may have your Web API Preview, click next and click Preview button. Now, go to Azure Activity Application and the application is created successfully and the local browser automatically opens. See your website and the link will be given below on the activity dialog box and there is no authentication, so no databases are available.

- Web Project is created
- It automatically opens your website given below.


Conclusion
- Finally, the Application has been created successfully and I will explain how to host it in Azure portal for the Web Application in my next article.

1 Comments
This comment has been removed by a blog administrator.
ReplyDeleteYou're comment here